Your Guide to Trendy Nails, Glowing Skin & Beauty Finds
A Step-by-Step Dry Brushing Routine: How to Dry Brush Your Body for Glowing Skin & Lymphatic Health
Learn how to dry brush your body the right way with this step-by-step dry brushing routine for glowing skin, lymphatic drainage, and better circulation. This beginner-friendly guide explains the benefits of dry brushing, proper stroke directions, and exact body placement to help exfoliate, detox, and boost skin health naturally. Perfect for anyone looking to elevate their self-care routine and achieve smooth, radiant skin from head to toe
BEAUTY

Dry brushing has become one of the most powerful self-care rituals for glowing skin, detox support, and full-body rejuvenation. This ancient practice uses a firm, natural-bristle brush on dry skin to stimulate circulation, exfoliate dead skin cells, and support the body’s natural lymphatic drainage system.
This step-by-step guide breaks it all down — including exact stroke directions and body placement so you can confidently dry brush the right way.
Step-by-Step Dry Brushing Routine (With Stroke Directions)
Step 1: Start at the Feet
Body Placement: Soles of feet and tops of feet
Stroke Direction: Upward toward the ankles
Begin at the very bottom of the body. Use long, sweeping strokes from the soles of your feet moving upward. Apply light to medium pressure — firm but never painful.
👉 This helps wake up circulation and activates lymph flow from the ground up.
Step 2: Brush the Lower Legs
Body Placement: Ankles, calves, shins
Stroke Direction: Upward toward the knees
Brush from your ankles up toward your knees using long, fluid strokes. Cover the front, back, and sides of the legs evenly.
👉 Always brush toward the heart to encourage proper lymphatic drainage.
Step 3: Move to the Thighs
Body Placement: Thighs and backs of legs
Stroke Direction: Upward toward the hips
Use slightly firmer pressure on thicker areas like the thighs. Focus on upward strokes from knees to hips, especially on areas prone to cellulite.
👉 Consistent brushing here can improve skin texture and circulation over time.
Step 4: Brush the Hips & Glutes
Body Placement: Hips and buttocks
Stroke Direction: Upward and inward toward the lower back
Use circular motions followed by upward strokes. This area benefits from stimulation due to lymph node concentration.
👉 This step helps release tension and supports detox pathways.
Step 5: Dry Brush the Abdomen
Body Placement: Stomach area
Stroke Direction: Clockwise circular motions
Use gentle pressure on the abdomen. Brush in clockwise circles, following the direction of digestion.
👉 This supports digestion, lymph movement, and gut health.
Step 6: Brush the Lower Back
Body Placement: Lower back and sides
Stroke Direction: Upward toward the center of the back
Use long strokes moving toward the spine and up toward the heart.
👉 This helps stimulate circulation and relieve tension stored in the back.
Step 7: Move to the Hands
Body Placement: Palms and backs of hands
Stroke Direction: Upward toward the wrists
Start at the fingertips and brush toward the wrists using light strokes.
👉 Hands often hold tension — this step helps release it while improving circulation.
Step 8: Brush the Arms
Body Placement: Forearms, elbows, upper arms
Stroke Direction: Upward toward the shoulders
Brush from wrists to elbows, then elbows to shoulders. Be gentle around sensitive inner arm areas.
👉 Arms drain lymph toward the armpits, so upward strokes are key.
Step 9: Finish at the Chest & Neck
Body Placement: Chest, collarbone, neck
Stroke Direction: Inward and downward toward the heart
Use very light pressure here. Brush from the chest inward toward the center and down toward the heart. For the neck, brush downward gently.
👉 This final step helps move lymph fluid toward major drainage points.
Final Thoughts: Make Dry Brushing a Ritual
Dry brushing isn’t just skincare — it’s a full-body wellness ritual. When done correctly and consistently, it supports glowing skin, better circulation, and deeper connection to your body.
Whether you’re starting a new self-care routine or elevating your wellness habits, this step-by-step dry brushing routine is one of the easiest ways to feel refreshed, energized, and confident in your skin.
After Dry Brushing: Seal the Glow
Shower to rinse away dead skin
Drink water to support detoxification
Dry Brushing Tips for Best Results
Always brush toward the heart
Avoid broken skin or active irritation
Use a natural-bristle brush
Replace your brush every 3–6 months
Consistency matters more than pressure
Why Dry Brushing Is So Good for Your Body
Dry brushing does more than smooth your skin — it activates systems inside your body that help you feel lighter, energized, and refreshed.
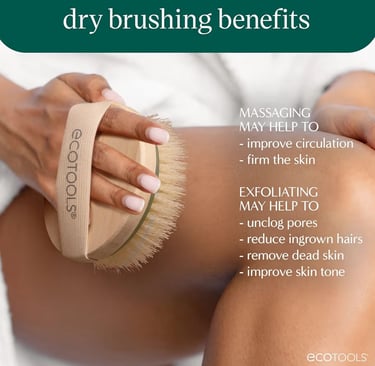
Top Benefits of Dry Brushing
Gently exfoliates dead skin for smoother, brighter skin
Boosts blood circulation and oxygen flow
Stimulates the lymphatic system to support detoxification
Helps reduce the appearance of cellulite over time
Promotes relaxation and mind-body connection
Encourages skin renewal and healthy glow
Because the lymphatic system doesn’t have a pump like the heart, dry brushing helps move stagnant lymph fluid — which is why stroke direction matters so much.
When & How Often to Dry Brush
Best done before showering
Ideal frequency: 3–5 times per week (daily if your skin tolerates it)
Takes 5–10 minutes
Always brush on dry skin and follow with a shower and a nourishing body oil or lotion.
Looking for the best dry brush for lymphatic drainage?
Choosing the right brush can help boost circulation and support healthy lymphatic flow. See my full guide to the 10 Best Dry Brushes for Lymphatic Drainage.
Stay Glowing All Year Long!💫
Elevate your confidence with our transformative blogs!
Glow and
Transform
© 2026. All rights reserved.